2015年10月8日 星期四

在 Ubuntu 12.04 LTS 上安裝 nautilus-gksu

Ubuntu 12.04 版本後 nautilus-gksu 套件,已經從 Ubuntu repositories 中移除了,要安裝必須把它重新加入,請參考下面方式加入及安裝 nautilus-gksu。

sudo apt-add-repository ppa:upubuntu-com/ppa
sudo apt-get update
sudo apt-get install nautilus-gksu

用下面指令或是登出系統在登入以重新啟動 nautilus,點選目錄右鍵後就可以在選單中看到 "Open as administrator" (以系統管理員身分開啟)選項。

nautilus -q

[Reference]

2015年10月4日 星期日

How to add/remove PPAs?

Add:
sudo add-apt-repository ppa:ubuntu-sdk-team/ppa
sudo apt-get update

Remove-1:
sudo add-apt-repository --remove ppa:ubuntu-sdk-team/ppa
sudo apt-get update

Remove-2:
sudo add-apt-repository -r ppa:ubuntu-sdk-team/ppa
sudo apt-get update

Remove-3 using ppa-purge tool:
sudo apt-get install ppa-purge
sudo ppa-purge ppa:ubuntu-sdk-team/ppa

Remove-4:
ls -al /etc/apt/sources.list.d
sudo rm -i /etc/apt/sources.list.d/ubuntu-sdk-team-ppa-precise.list

[References]

Virtualbox kernel service is not running

最近更新了 VirtualBox 4.3.30 版本後,然後再 Client OS Ubuntu 12.04 LTS 中重新安裝 Guest Additions 後;重新啟動 Ubuntu 時卻發現登入的時候會出現 "Virtualbox kernel service is not running" 的訊息,如下畫面所示:


最後在 "VirtualBox Ubuntu 14.04 - vboxclient the virtualbox kernel service is not running" 找到了解法,透過下面的方式重新安裝 Guest Additions 也無法解決問題。
linux:/media/VBOXADDITIONS_4.3.30_101610$ sudo ./VBoxLinuxAdditions.run

直到執行下面的命令後:
linux:~$ sudo /etc/init.d/vboxadd setup

出現下面的錯誤訊息:


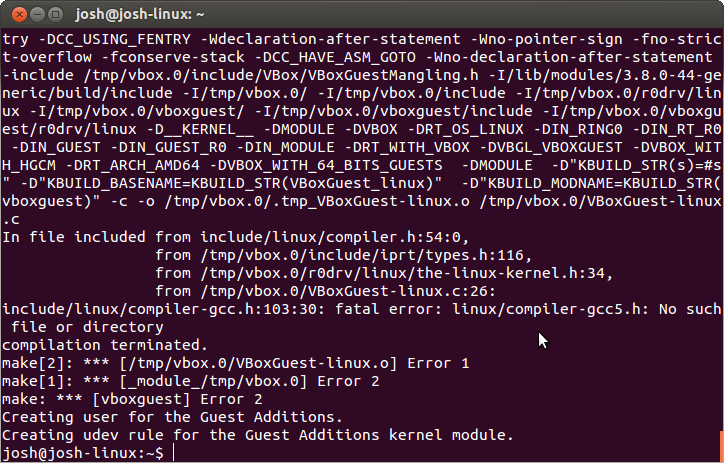
之後檢查訊息所提供的提示去檢查 /var/log/vboxadd-install.log 檔案,其訊息如下圖所示:


由上圖所示可以發現無法編譯成功,所以回想之前我有將 gcc 升級到 gcc5,且將其設定為預設的編譯器版本,因此將 gcc 版本設定回原本的 4.6.4 版本後,重新執行 vboxadd setup 就可以順利編譯成功,重新開機後也沒出現 "Virtualbox kernel service is not running" 的警告訊息囉。

2015年9月23日 星期三

查詢所安裝的 Ubuntu 版本訊息

1.lsb_release -a 查詢版本資訊
linux:~/Downloads$ lsb_release -a
No LSB modules are available.
Distributor ID: Ubuntu
Description: Ubuntu 12.04.4 LTS
Release: 12.04
Codename: precise

2.cat /etc/*release
linux:~/Downloads$ cat /etc/*release
DISTRIB_ID=Ubuntu
DISTRIB_RELEASE=12.04
DISTRIB_CODENAME=precise
DISTRIB_DESCRIPTION="Ubuntu 12.04.4 LTS"
NAME="Ubuntu"
VERSION="12.04.4 LTS, Precise Pangolin"
ID=ubuntu
ID_LIKE=debian
PRETTY_NAME="Ubuntu precise (12.04.4 LTS)"
VERSION_ID="12.04"

3. cat /etc/issue 或 cat /etc/issue.net
linux:~/Downloads$ cat /etc/issue
Ubuntu 12.04.4 LTS \n \l

linux:~/Downloads$ cat /etc/issue.net
Ubuntu 12.04.4 LTS

4. cat /proc/version 可以得知核心版本、何時編譯且用哪一版的 gcc 所編譯
linux:~/Downloads$ cat /proc/version
Linux version 3.8.0-42-generic (buildd@allspice) (gcc version 4.6.3 (Ubuntu/Linaro 4.6.3-1ubuntu5) ) #62~precise1-Ubuntu SMP Wed Jun 4 22:04:18 UTC 2014

5. uname -r 得知核心版本資訊
linux:~/Downloads$ uname -r
3.8.0-42-generic


6. uname -i 或 uname -m 取得目前的架構是 64 或 32 位元
linux:~/Downloads$ uname -i
x86_64
linux:~/Downloads$ uname -m
x86_64

7.file /sbin/init 取得目前的架構是 64 或 32 位元
linux:~/Downloads$ file /sbin/init
/sbin/init: ELF 64-bit LSB shared object, x86-64, version 1 (SYSV), dynamically linked (uses shared libs), for GNU/Linux 2.6.24, BuildID[sha1]=0x7aa29ded613e503fb09fb75d94026f3256f01e7a, stripped

8. dpkg --print-architecture 取得目前的架構是 64 或 32 位元
linux:~/Downloads$ dpkg --print-architecture
amd64

9. getconf LONG_BIT 取得目前的架構是 64 或 32 位元
linux:~/Downloads$ getconf LONG_BIT
64

10. uname -a 得知核心版本資訊以及架構 i386 為 32 位元; x86_64 為 64 位元
linux:~/Downloads$ uname -a
Linux linux 3.8.0-42-generic #62~precise1-Ubuntu SMP Wed Jun 4 22:04:18 UTC 2014 x86_64 x86_64 x86_64 GNU/Linux

11. cat /proc/cpuinfo 取的 CPU 資訊
linux:~/Downloads$ cat /proc/cpuinfo
processor : 0
vendor_id : GenuineIntel
cpu family : 6
model  : 42
model name : Intel(R) Pentium(R) CPU G840 @ 2.80GHz
stepping : 7
cpu MHz  : 2792.759
cache size : 6144 KB
fpu  : yes
fpu_exception : yes
cpuid level : 5
wp  : yes
flags  : fpu vme de pse tsc msr pae mce cx8 apic sep mtrr pge mca cmov pat pse36 clflush mmx fxsr sse sse2 syscall nx rdtscp lm constant_tsc rep_good nopl pni monitor ssse3 lahf_lm
bogomips : 5585.51
clflush size : 64
cache_alignment : 64
address sizes : 36 bits physical, 48 bits virtual
power management:


[參考資料]

如何升級升級/降級 Ubuntu 12.04 的 Firefox 以及安裝 Chrome

你可以透過 apt-cache show firefox | grep Version 指令來查詢目前 Ubuntu 所提供的套件版本資訊。在執行前請先執行 sudo apt-get update 指令以確保得到是最新資訊。執行後應該會顯示如下的訊息:
linux$ apt-cache show firefox | grep Version
Version: 41.0+build3-0ubuntu0.12.04.1
Version: 11.0+build1-0ubuntu4

更新 firefox 只需要下達如下指令即可,如果有新的版本可用便會開始安裝新版本。
sudo apt-get update
sudo apt-get install firefox

更新完後新版本如果有問題,如何將 firefox 安裝成以前的版本呢?

1. 到 https://launchpad.net/ubuntu/precise/+source/firefox 下載你要的版本。
這邊我們下載 firefox version 31.0 64 bit https://launchpad.net/~ubuntu-mozilla-security/+archive/ubuntu/ppa/+build/6185582/+files/firefox_31.0%2Bbuild1-0ubuntu0.12.04.1_amd64.deb

2. 解除安裝 firefox
sudo apt-get purge firefox


3. 安裝在第一步驟所下載的 firefox 套件。
sudo dpkg -i firefox_31.0+build1-0ubuntu0.12.04.1_amd64.deb

萬一在你下在 firefox 舊套件前你就把你的 firefox 移除的話,你可以透過 wget 來下載套件,然後在執行安裝即可。
wget https://launchpad.net/~ubuntu-mozilla-security/+archive/ubuntu/ppa/+build/6185582/+files/firefox_31.0%2Bbuild1-0ubuntu0.12.04.1_amd64.deb

如何安裝 Chrome,到 https://www.google.com.tw/chrome/browser/desktop/ 網頁按"下載"按鈕後;選擇你的 Linux 平台後按 "接受並安裝" 按鈕後;點選 "Open with" 然後選擇 "Ubuntu Software center" 如下圖所示:

等Ubuntu Software center開啟後按 install 按鈕即可以安裝 Chrome;如下圖所示:

[參考鏈結]

2015年9月21日 星期一

如何更新 Ubuntu 12.04 上的 gcc 與 g++

當安裝好 Ubuntu 12.04 其預設安裝的 gcc 與 g++ 版本為 4.6 你可以透過 g++ --version 來查詢你系統上的版本:
linux:~$ g++ --version
g++ (Ubuntu/Linaro 4.6.3-1ubuntu5) 4.6.3
Copyright (C) 2011 Free Software Foundation, Inc.
This is free software; see the source for copying conditions.  There is NO
warranty; not even for MERCHANTABILITY or FITNESS FOR A PARTICULAR PURPOSE.

更新步驟可依序執行下列指令即可:
sudo add-apt-repository ppa:ubuntu-toolchain-r/test
sudo apt-get update
sudo apt-get install gcc-5 g++-5

為了讓 update-alternatives 知道我們系統上有 2 套 gcc 與 g++ 編譯器,我們必須為每套 gcc 與 g++ 建立安裝紀錄;然後再透過 config 來設定系統所要載入的版本,設定方法如下:
sudo update-alternatives --install /usr/bin/gcc gcc /usr/bin/gcc-4.6 60 --slave /usr/bin/g++ g++ /usr/bin/g++-4.6
sudo update-alternatives --install /usr/bin/gcc gcc /usr/bin/gcc-5 40 --slave /usr/bin/g++ g++ /usr/bin/g++-5
sudo update-alternatives --config gcc

當你執行 sudo update-alternatives --config gcc 會看到如下的選單畫面,而在此畫面我選擇了 2:
linux:~$ sudo update-alternatives --config gcc
There are 2 choices for the alternative gcc (providing /usr/bin/gcc).

  Selection    Path              Priority   Status
------------------------------------------------------------
* 0            /usr/bin/gcc-4.6   60        auto mode
  1            /usr/bin/gcc-4.6   60        manual mode
  2            /usr/bin/gcc-5     40        manual mode

Press enter to keep the current choice[*], or type selection number: 2       
update-alternatives: using /usr/bin/gcc-5 to provide /usr/bin/gcc (gcc) in manual mode.

完成上面設定後執行 g++ --version 你應該可以看到如下面的訊息:
linux:~$ g++ --version
g++ (Ubuntu 5.1.0-0ubuntu11~12.04.2) 5.1.0
Copyright (C) 2015 Free Software Foundation, Inc.
This is free software; see the source for copying conditions.  There is NO
warranty; not even for MERCHANTABILITY or FITNESS FOR A PARTICULAR PURPOSE.


[參考連結]

2015年8月25日 星期二

如何透過 adb command 取得Android CPU 資訊

        將手機連上電腦後在 console Mode 下執行 "adb shell cat /proc/cpuinfo" 即可得到如下訊息,如果手機是四核心則會出現四次一樣的訊息。

~$ adb shell cat /proc/cpuinfo

processor : 0
vendor_id : GenuineIntel
cpu family : 6
model  : 90
model name : Intel(R) Atom(TM) CPU  Z3560  @ 1.00GHz
stepping : 0
microcode : 0x34
cpu MHz  : 500.000
cache size : 1024 KB
physical id : 0
siblings : 4
core id  : 0
cpu cores : 4
apicid  : 0
initial apicid : 0
fpu  : yes
fpu_exception : yes
cpuid level : 11
wp  : yes
flags  : fpu vme de pse tsc msr pae mce cx8 apic sep mtrr pge mca cmov pat pse36 clflush dts acpi mmx fxsr sse sse2 ss ht tm pbe syscall nx rdtscp lm constant_tsc arch_perfmon pebs bts rep_good nopl xtopology nonstop_tsc aperfmperf pni pclmulqdq dtes64 monitor ds_cpl vmx est tm2 ssse3 cx16 xtpr pdcm sse4_1 sse4_2 movbe popcnt tsc_deadline_timer aes rdrand lahf_lm 3dnowprefetch ida arat epb dtherm tpr_shadow vnmi flexpriority ept vpid tsc_adjust smep erms

[參考鏈結]