顯示具有 Ubuntu 標籤的文章。 顯示所有文章

2017年3月29日 星期三

如何在 Ubuntu 中自動掛載 virtualbox 的 Shared Folders

利用 Virtualbox 安裝 Guest OS 為 Ubutun 14.04 後,如何自動掛載 Shared Folders? PS: 要使用 Shared Folders 必須先安裝 Guest Additions。
  1. 設定 Shared Folders 為 Auto-mount, 當你設定為 Auto-mount後,預設載入點為 "/media/sf_[Folder Name]",但是你不是 root 或者 vboxsf 群族的使用者,沒有權限瀏覽這些目錄;所以必須把目前的使用者加入到 vboxsf 群組中,加入的方法可以使用下列指令,加入後必須先logout 再 login,完成後可以透過 id 指令檢查是否加入到 vboxsf 群組中。

  2. tmp@tmp-linux:~$ sudo gpasswd -a tmp vboxsf


  3. 修改 /etc/rc/rc.local,加入下列內容, Folder_Name 為利用 virtualbox 所設定的分享目錄名稱, your_mount_point 則為你像要掛載的路徑 例如: /home/userName/folderName,預設會是使 root 帳號,目前使用只可以瀏覽無法變更。

  4. mount -t vboxsf -o Folder_Name your_mount_point


  5. 修改 /etc/fstab,這個我沒有試過,請參考 How to mount a VirtualBox shared folder at startup?

Ubuntu 如何啟用,停用 root 帳號與切換為 root 使用者

Ubuntu 如何登入為ROOT使用者
Ubuntu 原本的 root 是預設尚未設定密碼(不是空白密碼), 第一次使用root的話使用sudo passwd root指令, 若之前尚未使用sudo執行其他指令, 此時一樣會提示你輸入你的使用者密碼(sudo確認身份用的).
當此密碼通過後, sudo會執行後面的指令, 也就是用root權限執行 passwd root(修改root密碼), 跟著系統提示輸入兩次root密碼後就將root密碼改成功了!

tmp@tmp-linux:~$ sudo passwd root
[sudo] password for tmp: 
Enter new UNIX password: 
Retype new UNIX password: 
passwd: password updated successfully

以後若不想用 sudo 而想直接用 root 權限的話就使用 su - 切換進 root 身份即可

tmp@tmp-linux:~$ su -
Password: 
root@tmp-linux:~#

若要檢查 root 帳號是否有被啟動,可以下面指令查詢 如果是啟動的狀態第二欄位會顯示 P, 否則顯是為 L:
tmp@tmp-linux:~$ sudo passwd -S root
root P 03/27/2017 0 99999 7 -1  #如果是 P 為啟動狀態
或者 
root L 03/27/2017 0 99999 7 -1  #如果是 P 為停用狀態
若要停用 root 帳號 可以使用
sudo passwd -l root
或者
sudo passwd -p '!' root

2016年3月7日 星期一

Enable workspaces on Ubuntu 14.04

By default the workspaces feature is not enable on Ubuntu 14.04,  hence you can use follow steps to enable it:

  1. Press Windows Key>> Type "appearance" and click Appearance icon
  2. Click "Behaviour" tab
  3. Check "Enable workspaces" and "Add show desktop icon to the launcher"

[Reference]

2015年10月12日 星期一

Ubuntu 指令

  • lsb_release -a 查詢系統版本資訊:
lsb_release -a

No LSB modules are available.
Distributor ID: Ubuntu
Description: Ubuntu 12.04.5 LTS
Release: 12.04
Codename: precise
  • sudo do-release-upgrade 透過終端機進行系統升級(12.04 to 14.04...etc),詳細資訊請參考 Upgrading
sudo do-release-upgrade
  • 更新系統套件,如果有相依性問題則保留套件不更新。
sudo apt-get update
sudo apt-get upgrade
  • 如果只需更新一個套件,則可以使用下列指令:
sudo apt-get update
sudo apt-get upgrade <套件名稱>

TIPS:執行「apt-get update」與「apt-get upgrade」通常會一起執行,因為 update 指令只是更新套件資料庫的軟體版本資訊,不會升級軟體套件。只有在執行過 upgrade 命令後,系統上已安裝的套件才會進行更新。

TIPS:執行「apt-get」指令時若加上「-y」參數,即表示執行時若遇到需要使用者決定是否繼續進行的場合,都會自動以「Yes」方式進行處理,此時便不需要使用者再輸入「Y」鍵。

TIPS:執行「upgrade」 參數時, 可能會看到有些套件維持在原有的版本而不會進行升級,這些套件包括系統核心(Kernel) 與重要的系統套件(如 libc)等等。如果要升級這些套件,另外執行 「sudo apt-get install <套件名稱列表>」指令即可,例如「sudo apt-get install libc-bin libc-dev-bin」。或是直接輸入「sudo apt-get dist-upgrade」亦可以解決問題。
  • 更新系統套件,如果套件有相依性問題則會試著解決此問題(通常被視為有風險的更新,伺服器不建議一開始就使該指令)。
sudo apt-get update
sudo apt-get dist-upgrade
  • APT 升級套件的同時將相依套件一併升級,則可以使用下列指令,如果未指定套件名稱,則會升級所有的相依套件:
sudo apt-get dist-upgrade <套件名稱>
例如:
sudo apt-get dist-upgrade filezilla

  • APT 移除套件但不移除設定檔與關聯檔,則可以使用下列指令:
sudo apt-get remove <套件名稱>
例如:
sudo apt-get remove filezilla

  • APT 徹底移除套件可以使用下列指令,下面兩個指令效果是相同的:
sudo apt-get remove --purge <套件名稱>
或
sudo apt-get purge  <套件名稱>
例如:
sudo apt-get remove --purge filezilla
sudo apt-get purge filezilla

  • APT 移除套件時一併將相依套件刪除可執行下列指令,如果再 autoremove 後面沒有加上套件名稱,則會將系統上所有未使用的相依套件全數刪除:
sudo apt-get autoremove <套件名稱>
例如:
sudo apt-get autoremove filezilla

  • APT 在安裝時會將套件下載到 「/var/cache/apt/archives/partial」目錄中,才進行安裝。我們可以透過 clean 參數來清除這些下載的套件檔案以釋放硬碟空間,而 autoclean 參數只會移除無法再被下載的套件檔案:
sudo apt-get clean
sudo apt-get autoclean

  • check 參數來檢查是否有套件相依性問題的存在:
sudo apt-get check

  • apt-cache search <關鍵字>」查詢套件的完整名稱,執行後 apt-cache 會在套件列表中的套件名稱或套件說明欄位進行搜尋,並將所有符合條件的套件顯示在畫面上:
sudo apt-cache search <關鍵字>
例如:
josh:~$ sudo apt-cache search xftp
gnome-user-share - User level public file sharing via WebDAV or ObexFTP
gvfs-backends - userspace virtual filesystem - backends
libobexftp-perl - perl binding to the object exchange file transfer library
libobexftp-ruby - ruby binding to the object exchange file transfer library
libobexftp0 - object exchange file transfer library
libobexftp0-dev - object exchange file transfer library - development files
obexfs - mount filesystem of ObexFTP capable devices
obexftp - file transfer utility for devices that use the OBEX protocol
obextool - graphical frontend for obexftp written in TCL/TK
python-obexftp - Python binding to the object exchange file transfer library
ussp-push - Client for OBEX PUSH

  • apt-cache show <套件名稱>」指令來顯示單一套件的相關資訊,並以較為容易閱讀的方式產生報表,提供此用者參考之用。show 參數會提供的套件資訊包括套件所屬性質、分類、檔案大小、相一套件以及是否會與其它套件產生衝突等訊息:
apt-cache show <套件名稱>
例如:
josh:~$ sudo apt-cache search filezilla
Package: filezilla
Priority: optional
Section: universe/net
Installed-Size: 3175
Maintainer: Ubuntu Developers 
Original-Maintainer: Adam Cécile (Le_Vert) 
Architecture: amd64
Version: 3.5.3-1ubuntu2
Depends: libc6 (>= 2.15), libdbus-1-3 (>= 1.1.1), libgcc1 (>= 1:4.1.1), libglib2.0-0 (>= 2.12.0), libgnutls26 (>= 2.12.6.1-0), libidn11 (>= 1.13), libsqlite3-0 (>= 3.5.9), libstdc++6 (>= 4.6), libtinyxml2.6.2, libwxbase2.8-0 (>= 2.8.12.1), libwxgtk2.8-0 (>= 2.8.12.1), filezilla-common (= 3.5.3-1ubuntu2)
Recommends: xdg-utils
Filename: pool/universe/f/filezilla/filezilla_3.5.3-1ubuntu2_amd64.deb
Size: 1318190
MD5sum: 923fef480256dc8c5f9470cce954a665
SHA1: 9297f7df88381a780cd8dd87b245d6f0efc77f8a
SHA256: 2f8c7c4e02329aad4fe7abec13bf97b6e33197f0fbc1cb764f6766b9487cfdd1
Description-en: Full-featured graphical FTP/FTPS/SFTP client
 FileZilla is a full-featured FTP client with an easy-to-use GUI.
...
...
  • apt-cache depends <套件名稱>」將套件的所有相依套件列出,並顯示是否與其它套件有所衝突。
  • apt-cache showpkg <套件名稱>」顯示指定套件的所有資訊,例如該套件目前的版本、此套件的相依套件關係等各種訊息。
  • 利用 dpkg 指令手動安裝軟體,Ubuntu 支援的套件檔案格式為 deb 檔,所以網路下載的 deb 檔案,應該都可以在 Ubuntu 之中順利安裝。但手動安裝套件最大的缺點是無法解決套件相依性問題。如果在使用 dpkg 安裝 deb 檔案時系統告知有相依套件需要先行安裝,只能自行找到相關的套件檔案,先行安裝後才能再安裝此套件,此用指令如下,參數 「-i 」表示安裝此套件
sudo dpkg -i <套件名稱>
例如:
sudo dpkg -i google-chrome-stable_current_i386.deb
  • 「dpkg -l <套件名稱>」 查詢已安裝套件的狀態,套件名稱可以使用萬用字元,或是利用 「dpkg -l | grep <套件名稱>」的方式進行查詢。
  • 「sudo dpkg -r <套件名稱>」 指令來移除套件,在移除時便需要輸入完整的套件名稱,如果不確定套件完整名稱,可利用 「dpkg -l 」指令進行查詢,之後在利用 「-r 」 參數移除套件 。
  • APT 相關目錄,APT 在執行時主要使用四個目錄,以作為檔案存放的空間。這四個目錄分別為:
1. /var/cache/apt/archives/ :已下載套件的存放處。
2. /var/cache/apt/archives/partial :下載中套件的存放處
3. /var/lib/apt/lists/ : sources.list 檔案中指定的套件來源其相關狀態與資訊之存放處。
4. /var/lib/apt/lists/partial/ :正在傳輸中的狀態資訊存放處。 
  • Ubuntu 預設不允許 root 帳號登入,甚至連 root 的密碼都是隨機產生且不告知使用者,所以只能使用一般使用者帳號登入系統。下面指令為如何切換成 root 帳號:
sudo su root
或
sudo su -
或 用 passwd 來修改 root 帳號密碼,然後再用 root 帳號登入
sudo passwd root 

[參考連結]

2015年10月10日 星期六

更新 Ubuntu 12.04 LTS 的 Libreoffice

Ubuntu 12.04 LTS 預設安裝的版本為 LibreOffice 3;如果要更新 Ubuntu 12.04 LTS 中的 LibreOffice 版本可以參考下列指令:
sudo add-apt-repository ppa:libreoffice/ppa
sudo apt-get update  
sudo apt-get install libreoffice

到今天為止,當你執行完後,最新的版本為 LibreOffice 5。
[參考鏈結]


Fail to load session "ubuntu"

今天手殘做了下面的動作,之後重新開機後就出現 Fail to load session "ubuntu" 的訊息,再也進不去桌面了。
sudo apt-get remove python
sudo apt-get autoremove

上面的錯誤訊息也可以由下面方式來重製:
sudo apt-get purge unity-2d
sudo apt-get autoremove

目前 Ubuntu 預設display manager為 lightdm,舊版為 gdm(gnome display manager),如果你移除了 lightdm 如下指令,則重新開機後直接進入文字模式,想恢復必須重新安裝 lightdm 與 ubuntu-desktop 套件即可。
sudo apt-get purge lightdm
sudo apt-get autoremove

因為無法進入桌面,所以要進入終端機的方式只能在登錄畫面按 CTRL + ALT + F1 開啟 tty1 終端機 (F2 可以開啟 tty2, 總共可以用到 F6, CTRL+ALT+F7 可以切回 GUI 畫面)。

注意:登入時在我的系統上右邊的數字鍵盤並非是數字,所以輸入了老半天總是無法登入成功;如果你也無法登入不彷試試不要使用鍵盤的數字鍵盤。

當登入後,要安裝套件時都出現 unable to resolve xxxx...,這時才發現網路不通,可透過下列查看網路狀況,如下圖:
ping www.google.com
ifconfig -a


由 ifconfig -a 我們可以發現我們的介面卡是在 eth1,所以透過下面的指令來啟動網卡以及取得 IP 位址,再次下達 ifconfig -a 我們可以看到網路卡已經取得 IP 位址了。
sudo ifconfig eth1 up
sudo dhclient eth1
ifconfig -a


解決網路的問題後,只要重新安裝 unity-2d 與 ubuntu-desktop 套件後,我們就可以跟以前一樣正常使用桌面了,指令如下:
sudo apt-get install --reinstall unity-2d
sudo apt-get install ubuntu-desktop

你也可以透過下面指令安裝其他桌面管理程式:
#KDE
sudo apt-get install kubuntu-desktop

#XFCE
sudo apt-get install xubuntu-desktop

#LXDE
sudo apt-get install lxde 


如果你沒有安裝 ubuntu-desktop 還是可以登入桌面,桌面工具列以及一些 icon 似乎不太正常,如下面畫面所示:


[參考鏈結]


2015年10月9日 星期五

Ubuntu 與安裝軟體有關的指令

要在 Ubuntu 作業系統安裝軟體的基本步驟如下:
  1. 將某個軟體的網站加到軟體來源列表裡(/etc/apt/sources.list)
  2. 更新系統的軟體資料庫列表
  3. 安裝該軟體套件
軟體來源列表是一個文字檔案(/etc/apt/sources.list),我們可以透過下面指令來查看該檔案的內容。
   
   sudo gedit /etc/apt/sources.list

下面為該檔案的部分內容,# 號開頭的為檔案註解可以不理會它;deb 開頭表示是 debian 套件包 (Ubuntu 的底層核心是 debian);接下來可以看到一個網址列,這是告訴系統要到哪個網站裡去下載這個套件包;接下來可以看到 precise ,這個是代表版號,每個版本都有不同的代號,代號可以查看這裡。最後的 universe 代表是社群維護的套件庫。Ubuntu 有四個內定的套件庫如下表:
  
## Major bug fix updates produced after the final release of the
## distribution.
deb http://us.archive.ubuntu.com/ubuntu/ precise-updates main restricted
deb-src http://us.archive.ubuntu.com/ubuntu/ precise-updates main restricted

## N.B. software from this repository is ENTIRELY UNSUPPORTED by the Ubuntu
## team. Also, please note that software in universe WILL NOT receive any
## review or updates from the Ubuntu security team.
deb http://us.archive.ubuntu.com/ubuntu/ precise universe 

Ubuntu 四個內定的套件庫如下表:
名稱 套件庫說明
Main 主要套件庫,由 Ubuntu 所支援維護。
Restricted 私有版權的硬體驅動程式。
Universe 由社群所維護支援的套件庫。
Multiverse 非自由的軟體套件庫。這裡指的非自由並非是不合法的軟體,而是這些軟體並不符合自由軟體授權模式。

在 Ubuntu 中所謂加入第三方軟體庫,只是很簡單的打開 /etc/apt/sources.list 這個文字檔,然後把官網提供的網址附加到最後一行,儲存起來就搞定了。但是由於手動更動這個文字檔有相當大的風險存在,因此 9.10 版本之後有了一個更好用的指令:
   
   add-apt-repository

這個指令顧名思義的就是加入第三方來源庫的指令,主要避免使用 gedit 文字處理器來處理一行行的網址列,同時配合近來流行的 PPA (Personal Pacakge Archives),讓你可以很方便的下載各式各樣的應用軟體。
接下來我們來實際安裝 Ubuntu-tweak 軟體套件,基本上你沒有加入該套件到軟體來源列表,當透過下面指令安裝程式時會出現 E: Unable to locate package ubuntu-tweak 的訊息:
   
josh:~$ sudo apt-get install ubuntu-tweak
[sudo] password for josh: 
Reading package lists... Done
Building dependency tree       
Reading state information... Done
E: Unable to locate package ubuntu-tweak

如我們前面所提要在 Ubuntu 作業系統安裝軟體的基本三步驟 1.加入第三方來源、2.更新軟體資料庫、3.安裝軟體:
 
sudo add-apt-repository ppa:tualatrix/ppa
sudo apt-get update
sudo apt-get install ubuntu-tweak

apt-get 的全名是 Advanced Package Tool-get,專業的套件包工具。update 是命令系統進行更新套件庫的動作。install 代表安裝,安裝甚麼呢,就是後面提供的套件名稱。

當我想知道套件庫裡有沒有一個套件叫做 scibus 的文書排版軟體,可以透過下面指令來查詢:
   
   apt-cache search scribus

上面的指令會在 apt 套件資料庫的快取裡,查詢名稱內容裡有 scribus 的套件並顯示出來。
安裝 scibus 套件:
   
   sudo apt-get install scribus

把它移除,但是保留設定檔:
   
   sudo apt-get remove scribus

把它移除,連設定檔也一併清除:
 
   sudo apt-get purge scribus
或  
   sudo apt-get remove --purge scribus

手動更新系統:
 
   sudo apt-get update
   sudo apt-get upgrade

注意:你可從網站下載附檔名為 deb 的安裝檔案,透過 deb 格式安裝的軟體並不會自動更新,也就是說假設安裝了 1.0 版本,但是現在有 1.1 版了,必須自行再次下載安裝;同時安裝 deb 格式時,有時候會遇到套件相依不足的問題,因此建議,若非必要,不要直接使用 deb 格式的檔案來進行應用程式安裝,而應該使用軟體中心或其他軟體來源庫的方式安裝。
[參考連結]

2015年10月8日 星期四

在 Ubuntu 12.04 LTS 上安裝 nautilus-gksu

Ubuntu 12.04 版本後 nautilus-gksu 套件,已經從 Ubuntu repositories 中移除了,要安裝必須把它重新加入,請參考下面方式加入及安裝 nautilus-gksu。

sudo apt-add-repository ppa:upubuntu-com/ppa
sudo apt-get update
sudo apt-get install nautilus-gksu

用下面指令或是登出系統在登入以重新啟動 nautilus,點選目錄右鍵後就可以在選單中看到 "Open as administrator" (以系統管理員身分開啟)選項。

nautilus -q

[Reference]

2015年10月4日 星期日

How to add/remove PPAs?

Add:
sudo add-apt-repository ppa:ubuntu-sdk-team/ppa
sudo apt-get update

Remove-1:
sudo add-apt-repository --remove ppa:ubuntu-sdk-team/ppa
sudo apt-get update

Remove-2:
sudo add-apt-repository -r ppa:ubuntu-sdk-team/ppa
sudo apt-get update

Remove-3 using ppa-purge tool:
sudo apt-get install ppa-purge
sudo ppa-purge ppa:ubuntu-sdk-team/ppa

Remove-4:
ls -al /etc/apt/sources.list.d
sudo rm -i /etc/apt/sources.list.d/ubuntu-sdk-team-ppa-precise.list

[References]

Virtualbox kernel service is not running

最近更新了 VirtualBox 4.3.30 版本後,然後再 Client OS Ubuntu 12.04 LTS 中重新安裝 Guest Additions 後;重新啟動 Ubuntu 時卻發現登入的時候會出現 "Virtualbox kernel service is not running" 的訊息,如下畫面所示:


最後在 "VirtualBox Ubuntu 14.04 - vboxclient the virtualbox kernel service is not running" 找到了解法,透過下面的方式重新安裝 Guest Additions 也無法解決問題。
linux:/media/VBOXADDITIONS_4.3.30_101610$ sudo ./VBoxLinuxAdditions.run

直到執行下面的命令後:
linux:~$ sudo /etc/init.d/vboxadd setup

出現下面的錯誤訊息:


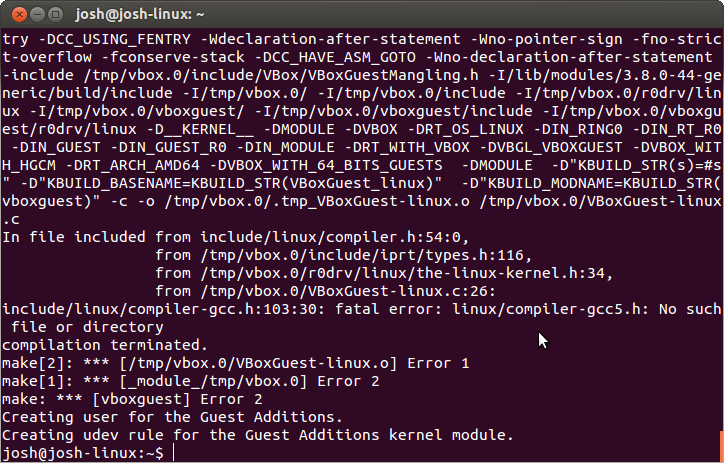
之後檢查訊息所提供的提示去檢查 /var/log/vboxadd-install.log 檔案,其訊息如下圖所示:


由上圖所示可以發現無法編譯成功,所以回想之前我有將 gcc 升級到 gcc5,且將其設定為預設的編譯器版本,因此將 gcc 版本設定回原本的 4.6.4 版本後,重新執行 vboxadd setup 就可以順利編譯成功,重新開機後也沒出現 "Virtualbox kernel service is not running" 的警告訊息囉。

2015年9月23日 星期三

查詢所安裝的 Ubuntu 版本訊息

1.lsb_release -a 查詢版本資訊
linux:~/Downloads$ lsb_release -a
No LSB modules are available.
Distributor ID: Ubuntu
Description: Ubuntu 12.04.4 LTS
Release: 12.04
Codename: precise

2.cat /etc/*release
linux:~/Downloads$ cat /etc/*release
DISTRIB_ID=Ubuntu
DISTRIB_RELEASE=12.04
DISTRIB_CODENAME=precise
DISTRIB_DESCRIPTION="Ubuntu 12.04.4 LTS"
NAME="Ubuntu"
VERSION="12.04.4 LTS, Precise Pangolin"
ID=ubuntu
ID_LIKE=debian
PRETTY_NAME="Ubuntu precise (12.04.4 LTS)"
VERSION_ID="12.04"

3. cat /etc/issue 或 cat /etc/issue.net
linux:~/Downloads$ cat /etc/issue
Ubuntu 12.04.4 LTS \n \l

linux:~/Downloads$ cat /etc/issue.net
Ubuntu 12.04.4 LTS

4. cat /proc/version 可以得知核心版本、何時編譯且用哪一版的 gcc 所編譯
linux:~/Downloads$ cat /proc/version
Linux version 3.8.0-42-generic (buildd@allspice) (gcc version 4.6.3 (Ubuntu/Linaro 4.6.3-1ubuntu5) ) #62~precise1-Ubuntu SMP Wed Jun 4 22:04:18 UTC 2014

5. uname -r 得知核心版本資訊
linux:~/Downloads$ uname -r
3.8.0-42-generic


6. uname -i 或 uname -m 取得目前的架構是 64 或 32 位元
linux:~/Downloads$ uname -i
x86_64
linux:~/Downloads$ uname -m
x86_64

7.file /sbin/init 取得目前的架構是 64 或 32 位元
linux:~/Downloads$ file /sbin/init
/sbin/init: ELF 64-bit LSB shared object, x86-64, version 1 (SYSV), dynamically linked (uses shared libs), for GNU/Linux 2.6.24, BuildID[sha1]=0x7aa29ded613e503fb09fb75d94026f3256f01e7a, stripped

8. dpkg --print-architecture 取得目前的架構是 64 或 32 位元
linux:~/Downloads$ dpkg --print-architecture
amd64

9. getconf LONG_BIT 取得目前的架構是 64 或 32 位元
linux:~/Downloads$ getconf LONG_BIT
64

10. uname -a 得知核心版本資訊以及架構 i386 為 32 位元; x86_64 為 64 位元
linux:~/Downloads$ uname -a
Linux linux 3.8.0-42-generic #62~precise1-Ubuntu SMP Wed Jun 4 22:04:18 UTC 2014 x86_64 x86_64 x86_64 GNU/Linux

11. cat /proc/cpuinfo 取的 CPU 資訊
linux:~/Downloads$ cat /proc/cpuinfo
processor : 0
vendor_id : GenuineIntel
cpu family : 6
model  : 42
model name : Intel(R) Pentium(R) CPU G840 @ 2.80GHz
stepping : 7
cpu MHz  : 2792.759
cache size : 6144 KB
fpu  : yes
fpu_exception : yes
cpuid level : 5
wp  : yes
flags  : fpu vme de pse tsc msr pae mce cx8 apic sep mtrr pge mca cmov pat pse36 clflush mmx fxsr sse sse2 syscall nx rdtscp lm constant_tsc rep_good nopl pni monitor ssse3 lahf_lm
bogomips : 5585.51
clflush size : 64
cache_alignment : 64
address sizes : 36 bits physical, 48 bits virtual
power management:


[參考資料]

如何升級升級/降級 Ubuntu 12.04 的 Firefox 以及安裝 Chrome

你可以透過 apt-cache show firefox | grep Version 指令來查詢目前 Ubuntu 所提供的套件版本資訊。在執行前請先執行 sudo apt-get update 指令以確保得到是最新資訊。執行後應該會顯示如下的訊息:
linux$ apt-cache show firefox | grep Version
Version: 41.0+build3-0ubuntu0.12.04.1
Version: 11.0+build1-0ubuntu4

更新 firefox 只需要下達如下指令即可,如果有新的版本可用便會開始安裝新版本。
sudo apt-get update
sudo apt-get install firefox

更新完後新版本如果有問題,如何將 firefox 安裝成以前的版本呢?

1. 到 https://launchpad.net/ubuntu/precise/+source/firefox 下載你要的版本。
這邊我們下載 firefox version 31.0 64 bit https://launchpad.net/~ubuntu-mozilla-security/+archive/ubuntu/ppa/+build/6185582/+files/firefox_31.0%2Bbuild1-0ubuntu0.12.04.1_amd64.deb

2. 解除安裝 firefox
sudo apt-get purge firefox


3. 安裝在第一步驟所下載的 firefox 套件。
sudo dpkg -i firefox_31.0+build1-0ubuntu0.12.04.1_amd64.deb

萬一在你下在 firefox 舊套件前你就把你的 firefox 移除的話,你可以透過 wget 來下載套件,然後在執行安裝即可。
wget https://launchpad.net/~ubuntu-mozilla-security/+archive/ubuntu/ppa/+build/6185582/+files/firefox_31.0%2Bbuild1-0ubuntu0.12.04.1_amd64.deb

如何安裝 Chrome,到 https://www.google.com.tw/chrome/browser/desktop/ 網頁按"下載"按鈕後;選擇你的 Linux 平台後按 "接受並安裝" 按鈕後;點選 "Open with" 然後選擇 "Ubuntu Software center" 如下圖所示:

等Ubuntu Software center開啟後按 install 按鈕即可以安裝 Chrome;如下圖所示:

[參考鏈結]

2015年9月21日 星期一

如何更新 Ubuntu 12.04 上的 gcc 與 g++

當安裝好 Ubuntu 12.04 其預設安裝的 gcc 與 g++ 版本為 4.6 你可以透過 g++ --version 來查詢你系統上的版本:
linux:~$ g++ --version
g++ (Ubuntu/Linaro 4.6.3-1ubuntu5) 4.6.3
Copyright (C) 2011 Free Software Foundation, Inc.
This is free software; see the source for copying conditions.  There is NO
warranty; not even for MERCHANTABILITY or FITNESS FOR A PARTICULAR PURPOSE.

更新步驟可依序執行下列指令即可:
sudo add-apt-repository ppa:ubuntu-toolchain-r/test
sudo apt-get update
sudo apt-get install gcc-5 g++-5

為了讓 update-alternatives 知道我們系統上有 2 套 gcc 與 g++ 編譯器,我們必須為每套 gcc 與 g++ 建立安裝紀錄;然後再透過 config 來設定系統所要載入的版本,設定方法如下:
sudo update-alternatives --install /usr/bin/gcc gcc /usr/bin/gcc-4.6 60 --slave /usr/bin/g++ g++ /usr/bin/g++-4.6
sudo update-alternatives --install /usr/bin/gcc gcc /usr/bin/gcc-5 40 --slave /usr/bin/g++ g++ /usr/bin/g++-5
sudo update-alternatives --config gcc

當你執行 sudo update-alternatives --config gcc 會看到如下的選單畫面,而在此畫面我選擇了 2:
linux:~$ sudo update-alternatives --config gcc
There are 2 choices for the alternative gcc (providing /usr/bin/gcc).

  Selection    Path              Priority   Status
------------------------------------------------------------
* 0            /usr/bin/gcc-4.6   60        auto mode
  1            /usr/bin/gcc-4.6   60        manual mode
  2            /usr/bin/gcc-5     40        manual mode

Press enter to keep the current choice[*], or type selection number: 2       
update-alternatives: using /usr/bin/gcc-5 to provide /usr/bin/gcc (gcc) in manual mode.

完成上面設定後執行 g++ --version 你應該可以看到如下面的訊息:
linux:~$ g++ --version
g++ (Ubuntu 5.1.0-0ubuntu11~12.04.2) 5.1.0
Copyright (C) 2015 Free Software Foundation, Inc.
This is free software; see the source for copying conditions.  There is NO
warranty; not even for MERCHANTABILITY or FITNESS FOR A PARTICULAR PURPOSE.


[參考連結]

2014年11月17日 星期一

"no JDK found – please set JAVA_HOME" while starting tomcat7


Solution 1 to make sure default-java exists underneath /usr/lib/jvm/ folder,if no, you can do something as follow:

ln -s /usr/lib/jvm/java-7-oracle /usr/lib/jvm/default-java

Solution 2 Add JAVA_HOME variable into /etc/default/tomcat7 file to specific JDK for tomcat7

sudo gedit /etc/default/tomcat7

Added JAVA_HOME variable

JAVA_HOME=/usr/lib/jvm/java-7-oracle

Reference:

2014年5月29日 星期四

Ubuntu 如何列出已安裝的 Pacakge

    Ubuntu 下要查詢已經安裝的套件可以透過下列指令

dpkg --get-selections | grep -v deinstal

    grep -v 主要過濾掉利用 dpkg 查詢時含有含有 deinstall ,你可以透過 grep --help 查詢參數用法

-v, --invert-match        select non-matching lines

[參考連結]

2014年1月6日 星期一

在 Virtualbox 中啟動 Ubuntu 12.04 LTS Unity-3D

    如果你想要讓安裝在 VitutalBox 中的 Ubuntu 12.04 LTS 支援 Unity-3D 的話,你只要執行下列步驟即可:

  1. Virtualbox 的 3D 加速必須勾選。
  2. 安裝 VirtualBox Guest Additions。
PS: 如果你執行了 apt-get update 與 apt-get dist-upgrade 後,發現原本的 Unity-3D 變成  Unity-2D的話,你只要重新安裝 VirtualBox Guest Additions 即可。

    另外,我在Youtube 找到教學影片,但是步驟有點繁瑣,如果上面方式無法解決你的問題,或許可以參考該影片:

[參考資料]

2013年12月29日 星期日

如何檢查你目前Ubuntu 桌面是使用 Unity-2d 或 Unity-3d 與確定目前系統是否有支援 Unity-3d

       檢查 Ubuntu 桌面是使用 Unity-2d 或 Unity-3d 你可以透過 "echo $DESKTOP_SESSION" 命令來檢查,執行畫面如下:

      如果目前使用 Unity-2d 會顯示 Ubuntu-2d,Unity-3d 則只會顯示 Ubuntu。

      另外如果你要確定系統是否有支援 Unity-3d,你可以透過 "/usr/lib/nux/unity_support_test -p" 來檢查,執行畫面如下:


[參考連結]

如何在 Windows XP 下透過 VirtualBox 安裝 64 bits Ubuntu 12.04 LTS

    如果你想要在 Windows XP 下安裝 64 bits Ubuntu 12.04 LTS,你必須確定下列項目你都已經設定好了,才可正常安裝:
  1. 啟動 VirtualBox VT-x / AMD-V ( VirtualBOx 4.3.12 如果 BISO 沒有先開啟支援虛擬化技術,加速的頁面是無法點選。), 如下圖:

  2. 啟動 BIOS 中 CPU 的虛擬化技術(Virtualization technology)。 
    如果你沒有在 BIOS 中啟動虛擬化技術時,當你啟動你的 VirtualBox 中的 Ubuntu 時,會看到如下的警告視窗:

 
    即便你點選繼續最後會停在開機畫面無法正常進入 ;其實從上面的訊息中 "請確認在您主機電腦的 BIOS 中已正確啟用 VT-x/AMD-V",就已經告訴你如何解決問題了。只要從新開起進入到 BIOS 中啟動虛擬技術就可以正常的啟動安裝 64 bits Ubuntu 12.04 LTS。

    下圖為 ASUS 主機板設定的方式:

後記:
       重新安裝電腦後,BIOS 也已經啟動虛擬技術,但 VirtualBox 依然無法正常偵測到 VT-x,找了老半天,還以為是 Windows 7 跟 VirtualBox 哪邊不和需要設定,最後發現是因為安裝了avast free antivirus 的防毒軟體,移除後就可以正常偵測到且可以正常起動Guest OS。之前無法執行 Windows 的磁碟掃描也是因為它。似乎要考慮別的免費防毒軟體了。 XD


[參考資料]


2013年9月6日 星期五

Ubuntu 修改hostname

     你可以透過修改 /etc/hostname 與 /etc/hosts 檔案來修改 Ubuntu 主機名稱,步驟如下:

1. 開啟 terminal 視窗

2. sudo gedit /etc/hostname &
    然後修改你要的名稱, ex: abc

3. sudo gedit /etc/hosts &
   修改第二行,你應該會看到 [127.0.1.1 你原本的Hostname],將原本的Hostname 改為新的 abc。
 更改此檔的目的在於避免一些網路的 service 會不正常 ex: Apache、Tomcat...etc.

 4. 重新開機即可。

       另外你也可以透過 hostname 來查看你目前的主機名稱與暫時修改主機名稱(重新開機後名稱又會變回去原本的)。

       如果不想重新開機,你可以下達下面的指令來暫時更改主機名稱:
       hostname <新名稱>
       ex: hostname abc

參考資料:
Ubuntu: How to Change the Computer Name
How do I change the hostname without a restart?