2015年10月12日 星期一

Ubuntu 指令

  • lsb_release -a 查詢系統版本資訊:
lsb_release -a

No LSB modules are available.
Distributor ID: Ubuntu
Description: Ubuntu 12.04.5 LTS
Release: 12.04
Codename: precise
  • sudo do-release-upgrade 透過終端機進行系統升級(12.04 to 14.04...etc),詳細資訊請參考 Upgrading
sudo do-release-upgrade
  • 更新系統套件,如果有相依性問題則保留套件不更新。
sudo apt-get update
sudo apt-get upgrade
  • 如果只需更新一個套件,則可以使用下列指令:
sudo apt-get update
sudo apt-get upgrade <套件名稱>

TIPS:執行「apt-get update」與「apt-get upgrade」通常會一起執行,因為 update 指令只是更新套件資料庫的軟體版本資訊,不會升級軟體套件。只有在執行過 upgrade 命令後,系統上已安裝的套件才會進行更新。

TIPS:執行「apt-get」指令時若加上「-y」參數,即表示執行時若遇到需要使用者決定是否繼續進行的場合,都會自動以「Yes」方式進行處理,此時便不需要使用者再輸入「Y」鍵。

TIPS:執行「upgrade」 參數時, 可能會看到有些套件維持在原有的版本而不會進行升級,這些套件包括系統核心(Kernel) 與重要的系統套件(如 libc)等等。如果要升級這些套件,另外執行 「sudo apt-get install <套件名稱列表>」指令即可,例如「sudo apt-get install libc-bin libc-dev-bin」。或是直接輸入「sudo apt-get dist-upgrade」亦可以解決問題。
  • 更新系統套件,如果套件有相依性問題則會試著解決此問題(通常被視為有風險的更新,伺服器不建議一開始就使該指令)。
sudo apt-get update
sudo apt-get dist-upgrade
  • APT 升級套件的同時將相依套件一併升級,則可以使用下列指令,如果未指定套件名稱,則會升級所有的相依套件:
sudo apt-get dist-upgrade <套件名稱>
例如:
sudo apt-get dist-upgrade filezilla

  • APT 移除套件但不移除設定檔與關聯檔,則可以使用下列指令:
sudo apt-get remove <套件名稱>
例如:
sudo apt-get remove filezilla

  • APT 徹底移除套件可以使用下列指令,下面兩個指令效果是相同的:
sudo apt-get remove --purge <套件名稱>
或
sudo apt-get purge  <套件名稱>
例如:
sudo apt-get remove --purge filezilla
sudo apt-get purge filezilla

  • APT 移除套件時一併將相依套件刪除可執行下列指令,如果再 autoremove 後面沒有加上套件名稱,則會將系統上所有未使用的相依套件全數刪除:
sudo apt-get autoremove <套件名稱>
例如:
sudo apt-get autoremove filezilla

  • APT 在安裝時會將套件下載到 「/var/cache/apt/archives/partial」目錄中,才進行安裝。我們可以透過 clean 參數來清除這些下載的套件檔案以釋放硬碟空間,而 autoclean 參數只會移除無法再被下載的套件檔案:
sudo apt-get clean
sudo apt-get autoclean

  • check 參數來檢查是否有套件相依性問題的存在:
sudo apt-get check

  • apt-cache search <關鍵字>」查詢套件的完整名稱,執行後 apt-cache 會在套件列表中的套件名稱或套件說明欄位進行搜尋,並將所有符合條件的套件顯示在畫面上:
sudo apt-cache search <關鍵字>
例如:
josh:~$ sudo apt-cache search xftp
gnome-user-share - User level public file sharing via WebDAV or ObexFTP
gvfs-backends - userspace virtual filesystem - backends
libobexftp-perl - perl binding to the object exchange file transfer library
libobexftp-ruby - ruby binding to the object exchange file transfer library
libobexftp0 - object exchange file transfer library
libobexftp0-dev - object exchange file transfer library - development files
obexfs - mount filesystem of ObexFTP capable devices
obexftp - file transfer utility for devices that use the OBEX protocol
obextool - graphical frontend for obexftp written in TCL/TK
python-obexftp - Python binding to the object exchange file transfer library
ussp-push - Client for OBEX PUSH

  • apt-cache show <套件名稱>」指令來顯示單一套件的相關資訊,並以較為容易閱讀的方式產生報表,提供此用者參考之用。show 參數會提供的套件資訊包括套件所屬性質、分類、檔案大小、相一套件以及是否會與其它套件產生衝突等訊息:
apt-cache show <套件名稱>
例如:
josh:~$ sudo apt-cache search filezilla
Package: filezilla
Priority: optional
Section: universe/net
Installed-Size: 3175
Maintainer: Ubuntu Developers 
Original-Maintainer: Adam Cécile (Le_Vert) 
Architecture: amd64
Version: 3.5.3-1ubuntu2
Depends: libc6 (>= 2.15), libdbus-1-3 (>= 1.1.1), libgcc1 (>= 1:4.1.1), libglib2.0-0 (>= 2.12.0), libgnutls26 (>= 2.12.6.1-0), libidn11 (>= 1.13), libsqlite3-0 (>= 3.5.9), libstdc++6 (>= 4.6), libtinyxml2.6.2, libwxbase2.8-0 (>= 2.8.12.1), libwxgtk2.8-0 (>= 2.8.12.1), filezilla-common (= 3.5.3-1ubuntu2)
Recommends: xdg-utils
Filename: pool/universe/f/filezilla/filezilla_3.5.3-1ubuntu2_amd64.deb
Size: 1318190
MD5sum: 923fef480256dc8c5f9470cce954a665
SHA1: 9297f7df88381a780cd8dd87b245d6f0efc77f8a
SHA256: 2f8c7c4e02329aad4fe7abec13bf97b6e33197f0fbc1cb764f6766b9487cfdd1
Description-en: Full-featured graphical FTP/FTPS/SFTP client
 FileZilla is a full-featured FTP client with an easy-to-use GUI.
...
...
  • apt-cache depends <套件名稱>」將套件的所有相依套件列出,並顯示是否與其它套件有所衝突。
  • apt-cache showpkg <套件名稱>」顯示指定套件的所有資訊,例如該套件目前的版本、此套件的相依套件關係等各種訊息。
  • 利用 dpkg 指令手動安裝軟體,Ubuntu 支援的套件檔案格式為 deb 檔,所以網路下載的 deb 檔案,應該都可以在 Ubuntu 之中順利安裝。但手動安裝套件最大的缺點是無法解決套件相依性問題。如果在使用 dpkg 安裝 deb 檔案時系統告知有相依套件需要先行安裝,只能自行找到相關的套件檔案,先行安裝後才能再安裝此套件,此用指令如下,參數 「-i 」表示安裝此套件
sudo dpkg -i <套件名稱>
例如:
sudo dpkg -i google-chrome-stable_current_i386.deb
  • 「dpkg -l <套件名稱>」 查詢已安裝套件的狀態,套件名稱可以使用萬用字元,或是利用 「dpkg -l | grep <套件名稱>」的方式進行查詢。
  • 「sudo dpkg -r <套件名稱>」 指令來移除套件,在移除時便需要輸入完整的套件名稱,如果不確定套件完整名稱,可利用 「dpkg -l 」指令進行查詢,之後在利用 「-r 」 參數移除套件 。
  • APT 相關目錄,APT 在執行時主要使用四個目錄,以作為檔案存放的空間。這四個目錄分別為:
1. /var/cache/apt/archives/ :已下載套件的存放處。
2. /var/cache/apt/archives/partial :下載中套件的存放處
3. /var/lib/apt/lists/ : sources.list 檔案中指定的套件來源其相關狀態與資訊之存放處。
4. /var/lib/apt/lists/partial/ :正在傳輸中的狀態資訊存放處。 
  • Ubuntu 預設不允許 root 帳號登入,甚至連 root 的密碼都是隨機產生且不告知使用者,所以只能使用一般使用者帳號登入系統。下面指令為如何切換成 root 帳號:
sudo su root
或
sudo su -
或 用 passwd 來修改 root 帳號密碼,然後再用 root 帳號登入
sudo passwd root 

[參考連結]

2015年10月10日 星期六

更新 Ubuntu 12.04 LTS 的 Libreoffice

Ubuntu 12.04 LTS 預設安裝的版本為 LibreOffice 3;如果要更新 Ubuntu 12.04 LTS 中的 LibreOffice 版本可以參考下列指令:
sudo add-apt-repository ppa:libreoffice/ppa
sudo apt-get update  
sudo apt-get install libreoffice

到今天為止,當你執行完後,最新的版本為 LibreOffice 5。
[參考鏈結]


moumoon沐月 Chu Chu 啾啾

今天開車時聽到廣播播放的歌曲,覺得不錯聽 ~:),原來又是沐月,記得之前她有一首 Sunshine Girl 也不錯聽,也是我在開車時所聽到的歌曲 XD!!!

moumoon沐月 Chu Chu 啾啾


moumoon沐月 Sunshine Girl

Fail to load session "ubuntu"

今天手殘做了下面的動作,之後重新開機後就出現 Fail to load session "ubuntu" 的訊息,再也進不去桌面了。
sudo apt-get remove python
sudo apt-get autoremove

上面的錯誤訊息也可以由下面方式來重製:
sudo apt-get purge unity-2d
sudo apt-get autoremove

目前 Ubuntu 預設display manager為 lightdm,舊版為 gdm(gnome display manager),如果你移除了 lightdm 如下指令,則重新開機後直接進入文字模式,想恢復必須重新安裝 lightdm 與 ubuntu-desktop 套件即可。
sudo apt-get purge lightdm
sudo apt-get autoremove

因為無法進入桌面,所以要進入終端機的方式只能在登錄畫面按 CTRL + ALT + F1 開啟 tty1 終端機 (F2 可以開啟 tty2, 總共可以用到 F6, CTRL+ALT+F7 可以切回 GUI 畫面)。

注意:登入時在我的系統上右邊的數字鍵盤並非是數字,所以輸入了老半天總是無法登入成功;如果你也無法登入不彷試試不要使用鍵盤的數字鍵盤。

當登入後,要安裝套件時都出現 unable to resolve xxxx...,這時才發現網路不通,可透過下列查看網路狀況,如下圖:
ping www.google.com
ifconfig -a


由 ifconfig -a 我們可以發現我們的介面卡是在 eth1,所以透過下面的指令來啟動網卡以及取得 IP 位址,再次下達 ifconfig -a 我們可以看到網路卡已經取得 IP 位址了。
sudo ifconfig eth1 up
sudo dhclient eth1
ifconfig -a


解決網路的問題後,只要重新安裝 unity-2d 與 ubuntu-desktop 套件後,我們就可以跟以前一樣正常使用桌面了,指令如下:
sudo apt-get install --reinstall unity-2d
sudo apt-get install ubuntu-desktop

你也可以透過下面指令安裝其他桌面管理程式:
#KDE
sudo apt-get install kubuntu-desktop

#XFCE
sudo apt-get install xubuntu-desktop

#LXDE
sudo apt-get install lxde 


如果你沒有安裝 ubuntu-desktop 還是可以登入桌面,桌面工具列以及一些 icon 似乎不太正常,如下面畫面所示:


[參考鏈結]


2015年10月9日 星期五

Ubuntu 與安裝軟體有關的指令

要在 Ubuntu 作業系統安裝軟體的基本步驟如下:
  1. 將某個軟體的網站加到軟體來源列表裡(/etc/apt/sources.list)
  2. 更新系統的軟體資料庫列表
  3. 安裝該軟體套件
軟體來源列表是一個文字檔案(/etc/apt/sources.list),我們可以透過下面指令來查看該檔案的內容。
   
   sudo gedit /etc/apt/sources.list

下面為該檔案的部分內容,# 號開頭的為檔案註解可以不理會它;deb 開頭表示是 debian 套件包 (Ubuntu 的底層核心是 debian);接下來可以看到一個網址列,這是告訴系統要到哪個網站裡去下載這個套件包;接下來可以看到 precise ,這個是代表版號,每個版本都有不同的代號,代號可以查看這裡。最後的 universe 代表是社群維護的套件庫。Ubuntu 有四個內定的套件庫如下表:
  
## Major bug fix updates produced after the final release of the
## distribution.
deb http://us.archive.ubuntu.com/ubuntu/ precise-updates main restricted
deb-src http://us.archive.ubuntu.com/ubuntu/ precise-updates main restricted

## N.B. software from this repository is ENTIRELY UNSUPPORTED by the Ubuntu
## team. Also, please note that software in universe WILL NOT receive any
## review or updates from the Ubuntu security team.
deb http://us.archive.ubuntu.com/ubuntu/ precise universe 

Ubuntu 四個內定的套件庫如下表:
名稱 套件庫說明
Main 主要套件庫,由 Ubuntu 所支援維護。
Restricted 私有版權的硬體驅動程式。
Universe 由社群所維護支援的套件庫。
Multiverse 非自由的軟體套件庫。這裡指的非自由並非是不合法的軟體,而是這些軟體並不符合自由軟體授權模式。

在 Ubuntu 中所謂加入第三方軟體庫,只是很簡單的打開 /etc/apt/sources.list 這個文字檔,然後把官網提供的網址附加到最後一行,儲存起來就搞定了。但是由於手動更動這個文字檔有相當大的風險存在,因此 9.10 版本之後有了一個更好用的指令:
   
   add-apt-repository

這個指令顧名思義的就是加入第三方來源庫的指令,主要避免使用 gedit 文字處理器來處理一行行的網址列,同時配合近來流行的 PPA (Personal Pacakge Archives),讓你可以很方便的下載各式各樣的應用軟體。
接下來我們來實際安裝 Ubuntu-tweak 軟體套件,基本上你沒有加入該套件到軟體來源列表,當透過下面指令安裝程式時會出現 E: Unable to locate package ubuntu-tweak 的訊息:
   
josh:~$ sudo apt-get install ubuntu-tweak
[sudo] password for josh: 
Reading package lists... Done
Building dependency tree       
Reading state information... Done
E: Unable to locate package ubuntu-tweak

如我們前面所提要在 Ubuntu 作業系統安裝軟體的基本三步驟 1.加入第三方來源、2.更新軟體資料庫、3.安裝軟體:
 
sudo add-apt-repository ppa:tualatrix/ppa
sudo apt-get update
sudo apt-get install ubuntu-tweak

apt-get 的全名是 Advanced Package Tool-get,專業的套件包工具。update 是命令系統進行更新套件庫的動作。install 代表安裝,安裝甚麼呢,就是後面提供的套件名稱。

當我想知道套件庫裡有沒有一個套件叫做 scibus 的文書排版軟體,可以透過下面指令來查詢:
   
   apt-cache search scribus

上面的指令會在 apt 套件資料庫的快取裡,查詢名稱內容裡有 scribus 的套件並顯示出來。
安裝 scibus 套件:
   
   sudo apt-get install scribus

把它移除,但是保留設定檔:
   
   sudo apt-get remove scribus

把它移除,連設定檔也一併清除:
 
   sudo apt-get purge scribus
或  
   sudo apt-get remove --purge scribus

手動更新系統:
 
   sudo apt-get update
   sudo apt-get upgrade

注意:你可從網站下載附檔名為 deb 的安裝檔案,透過 deb 格式安裝的軟體並不會自動更新,也就是說假設安裝了 1.0 版本,但是現在有 1.1 版了,必須自行再次下載安裝;同時安裝 deb 格式時,有時候會遇到套件相依不足的問題,因此建議,若非必要,不要直接使用 deb 格式的檔案來進行應用程式安裝,而應該使用軟體中心或其他軟體來源庫的方式安裝。
[參考連結]

2015年10月8日 星期四

在 Ubuntu 12.04 LTS 上安裝 nautilus-gksu

Ubuntu 12.04 版本後 nautilus-gksu 套件,已經從 Ubuntu repositories 中移除了,要安裝必須把它重新加入,請參考下面方式加入及安裝 nautilus-gksu。

sudo apt-add-repository ppa:upubuntu-com/ppa
sudo apt-get update
sudo apt-get install nautilus-gksu

用下面指令或是登出系統在登入以重新啟動 nautilus,點選目錄右鍵後就可以在選單中看到 "Open as administrator" (以系統管理員身分開啟)選項。

nautilus -q

[Reference]

2015年10月4日 星期日

How to add/remove PPAs?

Add:
sudo add-apt-repository ppa:ubuntu-sdk-team/ppa
sudo apt-get update

Remove-1:
sudo add-apt-repository --remove ppa:ubuntu-sdk-team/ppa
sudo apt-get update

Remove-2:
sudo add-apt-repository -r ppa:ubuntu-sdk-team/ppa
sudo apt-get update

Remove-3 using ppa-purge tool:
sudo apt-get install ppa-purge
sudo ppa-purge ppa:ubuntu-sdk-team/ppa

Remove-4:
ls -al /etc/apt/sources.list.d
sudo rm -i /etc/apt/sources.list.d/ubuntu-sdk-team-ppa-precise.list

[References]

Virtualbox kernel service is not running

最近更新了 VirtualBox 4.3.30 版本後,然後再 Client OS Ubuntu 12.04 LTS 中重新安裝 Guest Additions 後;重新啟動 Ubuntu 時卻發現登入的時候會出現 "Virtualbox kernel service is not running" 的訊息,如下畫面所示:


最後在 "VirtualBox Ubuntu 14.04 - vboxclient the virtualbox kernel service is not running" 找到了解法,透過下面的方式重新安裝 Guest Additions 也無法解決問題。
linux:/media/VBOXADDITIONS_4.3.30_101610$ sudo ./VBoxLinuxAdditions.run

直到執行下面的命令後:
linux:~$ sudo /etc/init.d/vboxadd setup

出現下面的錯誤訊息:


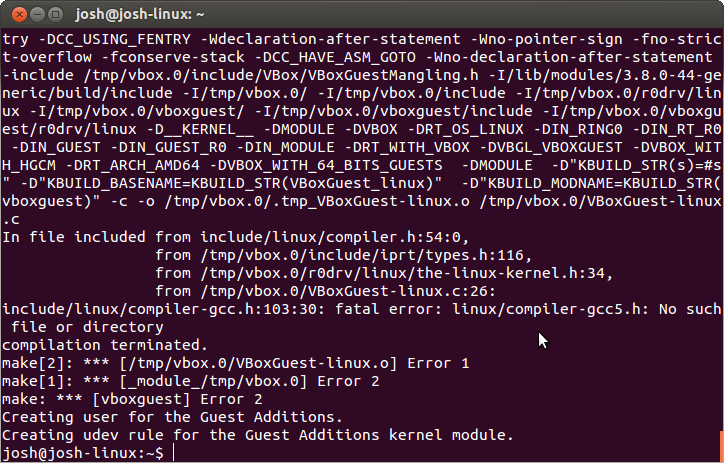
之後檢查訊息所提供的提示去檢查 /var/log/vboxadd-install.log 檔案,其訊息如下圖所示:


由上圖所示可以發現無法編譯成功,所以回想之前我有將 gcc 升級到 gcc5,且將其設定為預設的編譯器版本,因此將 gcc 版本設定回原本的 4.6.4 版本後,重新執行 vboxadd setup 就可以順利編譯成功,重新開機後也沒出現 "Virtualbox kernel service is not running" 的警告訊息囉。

2015年9月23日 星期三

查詢所安裝的 Ubuntu 版本訊息

1.lsb_release -a 查詢版本資訊
linux:~/Downloads$ lsb_release -a
No LSB modules are available.
Distributor ID: Ubuntu
Description: Ubuntu 12.04.4 LTS
Release: 12.04
Codename: precise

2.cat /etc/*release
linux:~/Downloads$ cat /etc/*release
DISTRIB_ID=Ubuntu
DISTRIB_RELEASE=12.04
DISTRIB_CODENAME=precise
DISTRIB_DESCRIPTION="Ubuntu 12.04.4 LTS"
NAME="Ubuntu"
VERSION="12.04.4 LTS, Precise Pangolin"
ID=ubuntu
ID_LIKE=debian
PRETTY_NAME="Ubuntu precise (12.04.4 LTS)"
VERSION_ID="12.04"

3. cat /etc/issue 或 cat /etc/issue.net
linux:~/Downloads$ cat /etc/issue
Ubuntu 12.04.4 LTS \n \l

linux:~/Downloads$ cat /etc/issue.net
Ubuntu 12.04.4 LTS

4. cat /proc/version 可以得知核心版本、何時編譯且用哪一版的 gcc 所編譯
linux:~/Downloads$ cat /proc/version
Linux version 3.8.0-42-generic (buildd@allspice) (gcc version 4.6.3 (Ubuntu/Linaro 4.6.3-1ubuntu5) ) #62~precise1-Ubuntu SMP Wed Jun 4 22:04:18 UTC 2014

5. uname -r 得知核心版本資訊
linux:~/Downloads$ uname -r
3.8.0-42-generic


6. uname -i 或 uname -m 取得目前的架構是 64 或 32 位元
linux:~/Downloads$ uname -i
x86_64
linux:~/Downloads$ uname -m
x86_64

7.file /sbin/init 取得目前的架構是 64 或 32 位元
linux:~/Downloads$ file /sbin/init
/sbin/init: ELF 64-bit LSB shared object, x86-64, version 1 (SYSV), dynamically linked (uses shared libs), for GNU/Linux 2.6.24, BuildID[sha1]=0x7aa29ded613e503fb09fb75d94026f3256f01e7a, stripped

8. dpkg --print-architecture 取得目前的架構是 64 或 32 位元
linux:~/Downloads$ dpkg --print-architecture
amd64

9. getconf LONG_BIT 取得目前的架構是 64 或 32 位元
linux:~/Downloads$ getconf LONG_BIT
64

10. uname -a 得知核心版本資訊以及架構 i386 為 32 位元; x86_64 為 64 位元
linux:~/Downloads$ uname -a
Linux linux 3.8.0-42-generic #62~precise1-Ubuntu SMP Wed Jun 4 22:04:18 UTC 2014 x86_64 x86_64 x86_64 GNU/Linux

11. cat /proc/cpuinfo 取的 CPU 資訊
linux:~/Downloads$ cat /proc/cpuinfo
processor : 0
vendor_id : GenuineIntel
cpu family : 6
model  : 42
model name : Intel(R) Pentium(R) CPU G840 @ 2.80GHz
stepping : 7
cpu MHz  : 2792.759
cache size : 6144 KB
fpu  : yes
fpu_exception : yes
cpuid level : 5
wp  : yes
flags  : fpu vme de pse tsc msr pae mce cx8 apic sep mtrr pge mca cmov pat pse36 clflush mmx fxsr sse sse2 syscall nx rdtscp lm constant_tsc rep_good nopl pni monitor ssse3 lahf_lm
bogomips : 5585.51
clflush size : 64
cache_alignment : 64
address sizes : 36 bits physical, 48 bits virtual
power management:


[參考資料]

如何升級升級/降級 Ubuntu 12.04 的 Firefox 以及安裝 Chrome

你可以透過 apt-cache show firefox | grep Version 指令來查詢目前 Ubuntu 所提供的套件版本資訊。在執行前請先執行 sudo apt-get update 指令以確保得到是最新資訊。執行後應該會顯示如下的訊息:
linux$ apt-cache show firefox | grep Version
Version: 41.0+build3-0ubuntu0.12.04.1
Version: 11.0+build1-0ubuntu4

更新 firefox 只需要下達如下指令即可,如果有新的版本可用便會開始安裝新版本。
sudo apt-get update
sudo apt-get install firefox

更新完後新版本如果有問題,如何將 firefox 安裝成以前的版本呢?

1. 到 https://launchpad.net/ubuntu/precise/+source/firefox 下載你要的版本。
這邊我們下載 firefox version 31.0 64 bit https://launchpad.net/~ubuntu-mozilla-security/+archive/ubuntu/ppa/+build/6185582/+files/firefox_31.0%2Bbuild1-0ubuntu0.12.04.1_amd64.deb

2. 解除安裝 firefox
sudo apt-get purge firefox


3. 安裝在第一步驟所下載的 firefox 套件。
sudo dpkg -i firefox_31.0+build1-0ubuntu0.12.04.1_amd64.deb

萬一在你下在 firefox 舊套件前你就把你的 firefox 移除的話,你可以透過 wget 來下載套件,然後在執行安裝即可。
wget https://launchpad.net/~ubuntu-mozilla-security/+archive/ubuntu/ppa/+build/6185582/+files/firefox_31.0%2Bbuild1-0ubuntu0.12.04.1_amd64.deb

如何安裝 Chrome,到 https://www.google.com.tw/chrome/browser/desktop/ 網頁按"下載"按鈕後;選擇你的 Linux 平台後按 "接受並安裝" 按鈕後;點選 "Open with" 然後選擇 "Ubuntu Software center" 如下圖所示:

等Ubuntu Software center開啟後按 install 按鈕即可以安裝 Chrome;如下圖所示:

[參考鏈結]

2015年9月21日 星期一

如何更新 Ubuntu 12.04 上的 gcc 與 g++

當安裝好 Ubuntu 12.04 其預設安裝的 gcc 與 g++ 版本為 4.6 你可以透過 g++ --version 來查詢你系統上的版本:
linux:~$ g++ --version
g++ (Ubuntu/Linaro 4.6.3-1ubuntu5) 4.6.3
Copyright (C) 2011 Free Software Foundation, Inc.
This is free software; see the source for copying conditions.  There is NO
warranty; not even for MERCHANTABILITY or FITNESS FOR A PARTICULAR PURPOSE.

更新步驟可依序執行下列指令即可:
sudo add-apt-repository ppa:ubuntu-toolchain-r/test
sudo apt-get update
sudo apt-get install gcc-5 g++-5

為了讓 update-alternatives 知道我們系統上有 2 套 gcc 與 g++ 編譯器,我們必須為每套 gcc 與 g++ 建立安裝紀錄;然後再透過 config 來設定系統所要載入的版本,設定方法如下:
sudo update-alternatives --install /usr/bin/gcc gcc /usr/bin/gcc-4.6 60 --slave /usr/bin/g++ g++ /usr/bin/g++-4.6
sudo update-alternatives --install /usr/bin/gcc gcc /usr/bin/gcc-5 40 --slave /usr/bin/g++ g++ /usr/bin/g++-5
sudo update-alternatives --config gcc

當你執行 sudo update-alternatives --config gcc 會看到如下的選單畫面,而在此畫面我選擇了 2:
linux:~$ sudo update-alternatives --config gcc
There are 2 choices for the alternative gcc (providing /usr/bin/gcc).

  Selection    Path              Priority   Status
------------------------------------------------------------
* 0            /usr/bin/gcc-4.6   60        auto mode
  1            /usr/bin/gcc-4.6   60        manual mode
  2            /usr/bin/gcc-5     40        manual mode

Press enter to keep the current choice[*], or type selection number: 2       
update-alternatives: using /usr/bin/gcc-5 to provide /usr/bin/gcc (gcc) in manual mode.

完成上面設定後執行 g++ --version 你應該可以看到如下面的訊息:
linux:~$ g++ --version
g++ (Ubuntu 5.1.0-0ubuntu11~12.04.2) 5.1.0
Copyright (C) 2015 Free Software Foundation, Inc.
This is free software; see the source for copying conditions.  There is NO
warranty; not even for MERCHANTABILITY or FITNESS FOR A PARTICULAR PURPOSE.


[參考連結]

2015年8月25日 星期二

如何透過 adb command 取得Android CPU 資訊

        將手機連上電腦後在 console Mode 下執行 "adb shell cat /proc/cpuinfo" 即可得到如下訊息,如果手機是四核心則會出現四次一樣的訊息。

~$ adb shell cat /proc/cpuinfo

processor : 0
vendor_id : GenuineIntel
cpu family : 6
model  : 90
model name : Intel(R) Atom(TM) CPU  Z3560  @ 1.00GHz
stepping : 0
microcode : 0x34
cpu MHz  : 500.000
cache size : 1024 KB
physical id : 0
siblings : 4
core id  : 0
cpu cores : 4
apicid  : 0
initial apicid : 0
fpu  : yes
fpu_exception : yes
cpuid level : 11
wp  : yes
flags  : fpu vme de pse tsc msr pae mce cx8 apic sep mtrr pge mca cmov pat pse36 clflush dts acpi mmx fxsr sse sse2 ss ht tm pbe syscall nx rdtscp lm constant_tsc arch_perfmon pebs bts rep_good nopl xtopology nonstop_tsc aperfmperf pni pclmulqdq dtes64 monitor ds_cpl vmx est tm2 ssse3 cx16 xtpr pdcm sse4_1 sse4_2 movbe popcnt tsc_deadline_timer aes rdrand lahf_lm 3dnowprefetch ida arat epb dtherm tpr_shadow vnmi flexpriority ept vpid tsc_adjust smep erms

[參考鏈結]

2015年5月26日 星期二

[Error] Invalid conversion from 'int' to 'main(int, char**)::fruit_tea' [-fpermissive]


當你嘗試編譯將 int 數值指定給 enum 型態的變數時,會出現編譯錯誤訊息如下:
Invalid conversion from 'int' to 'main(int, char**)::fruit_tea' [-fpermissive]

範例程式如下:
#include <iostream>

/* run this program using the console pauser or add your own getch, system("pause") or input loop */

int main(int argc, char** argv) 
{
 enum fruit_tea { apple, banana, orange } taste;
 taste = 10;
 std::cout << taste << std::endl;
 return 0;
}

解決方法就是將 fpermissive flag 加入到編譯的選項中,下面的圖示是使用 OrWell Dev-C++ IDE,設定方法步驟:點選 project 右鍵 >> Project Options... >> Parameters 在 C++ compiler中填入 -fpermissive 即可。重新編譯程式時,原本錯誤的地方就變成是 Warning 了。


下面有關 fpermissive flag 的解釋擷取至 3.5 Options Controlling C++ Dialect 。主要是讓原本編譯器將某些不合適的 code 判斷為錯誤的訊息改成為警告訊息,以便讓程式可以編譯成功。

-fpermissive
Downgrade some diagnostics about nonconformant code from errors to warnings. Thus, using -fpermissive will allow some nonconforming code to compile. 

上面的例子,想要將整數值指定給列舉型態變數;因為指定的整數值未必在列舉型態的範圍內,所以C++ 禁止將 整數值指定給 列舉型態變數,但可以將列舉型態變數值指定給整數型態變數,因為列舉型態也是一種整數型態。

基本上不建議使用 fpermissive flag 來解此類的問題,如上面所說 整數值未必在 列舉型態的範圍中,允許指定整數值給列舉型態可能會造成不必要的麻煩。


[相關鏈結]

2015年5月21日 星期四

Error C4335: Mac file format detected: please convert the source file to either DOS or UNIX format

最近把一個 Third Party Lib include 到專案內;使用VS 2010 編譯時卻出現下列問題,在 Ubuntu下編譯卻不會這樣的問題發生。比較快的方式是將所有的 Third Party 的 Source code 修正成 Windows 或者 UNIX 的檔案格式。但這樣不是很理想,我們不應該修改 Third Party 的Source code 除非必要。這樣以後要 Upgrade 才不會遇到太多問題。
 
error C4335: Mac file format detected: please convert the source file to either DOS or UNIX format

要解決這個問題又不改到 Third Party Source Code 的方法就是直接把那個 C4335 關閉即可,下面是如何關閉的圖示:


  • 點選專案 > 右鍵 > 選擇 Properties
  • Configuration Properties > C/C++ > Advanced > Disable Specific Warnings 填入 4335 即可。


2015年1月21日 星期三

讓 Code::Blocks IDE 輸出中繼檔案

     編譯 C/C++ 檔案時你可以設定 flag 讓編譯器產邊中繼檔案,一般  Code::Blocks 未做任何設定時只會輸出 .o 檔,如果你編譯器是使用 GCC,那麼你可以設定編譯器的 -save-temps 來輸出 .ii 與 .s 檔。.ii 就是前置處理器完後的 source 檔,.s 就是 asm 檔。如果使用 -save-temps 則輸出的檔案與你的 cpp 檔案放在同一個目錄下,而設定為 -save-temps=obj 則會輸出到 obj 的目錄下。下面是 Code::Blocks 設定畫面:


2015年1月8日 星期四

如何用 Code::Blocks IDE 編譯 C++11 程式

      假設你在 Code::Blocks 中,專案使用的是 g++ 編譯器來編譯,你可以點選專案右鍵後選擇 "Build options..." 然後將 -std=c++11 選項勾選即可編譯 c++11 feature 的程式了。
設定畫面如下:


測試範例程式如下:(來源 C++11 Wiki Range-based_for_loop)

#include <iostream>

using namespace std;

int main()
{
    //Range-based for loop
    int my_array[5] = {1, 2, 3, 4, 5};
    for (auto &x : my_array) {
        cout << x << " ";
    }
    cout << endl;
    return 0;
}

       注意:專案的編譯器設定會被 全域的編譯器設定所覆蓋,假設你在專案中設定 -std=c++11,但在全域編譯器中設定了 -std=c++98,則編譯最後是使用 c++98來編譯程式。 檢查 Build log 你會發現,編譯的指令為 mingw32-g++.exe -Wall -fexceptions -std=c++11 -g -std=c++98 ...。

Code::Blocks IDE 如何設定 Boost C++ libraries

        先到 Boost C++ libraries 網站下載 Boost libs 壓縮檔案,然後將其解壓縮,解壓縮後的目錄結構如下:

     然後開啟 Code::Blocks IDE,執行 Settings > Compiler... 項目,切換到 Search directories 也面分別設定 Compiler 與 Linker 的路徑即可,設定畫面如下:
  • 設定 Compiler 搜尋路徑

  • 設定 Linker 搜尋路徑


設定好後,可以透過下列的範例程式來驗證是否設定正確:

#include <iostream>
using std::cout;
using std::endl;

#include  <boost\shared_ptr.hpp>
using boost::shared_ptr;

int main()
{
    shared_ptr<int>sp(new int(5));
    cout << *sp << endl;
    return 0;
}

2015年1月3日 星期六

新增修改 Code::Blocks 的 Colour themes

    安裝完後的 Code::Blocks IDE 其 Colour Theme 只有一個 default可以選擇,如果想要新增、更換 Colour Theme 請依據下列幾個步驟來完成更新替換Colour Theme。
  1. 關閉 Code::Blocks IDE。

  2. 到 Syntax highlighting custom colour themes 將 wiki 網頁所 po 的 xml 文字訊息拷貝下來,另存 *.conf 檔案 (i.e: colour_themes.conf )。

  3. 執行 cb_share_config.exe 程式 (該程式可在 Code::Blocks IDE 安裝路徑下找到 ) 。Win7/Win8 可以透過下列方式找到該程式。

  4. 當開啟 CB Share Config 程式後,左邊選擇你所另存的 *.conf 檔,右邊選擇 Code::Blocks 的 default.conf 檔案 (可在 C:\Users\[你登入的帳號]\AppData\Roaming\CodeBlocks 下找到);之後在左邊勾選你想要匯入的 Colour Theme 項目,按 Transfer 後會跳出幾個視窗,按確定即可;最後要按 Save 才會將設定檔寫入到 default.conf 檔案中。可參考下列圖示:

  5. 開啟 Code::Blocks IDE 點選 Settings->Editor... 選擇 Syntax highlighting後,如果一切順利你可以在 Colour Theme 中發現我們剛剛所新增的 Themes,選擇其一來更換你的 Theme。

  6. 如果你選擇黑色背景的 Theme 請記得設定 Caret,因為預設的顏色是黑色的,如果沒更換會無法得知目前停留或編輯到哪一行。設定方式點選 Settings->Editor... 選擇 Margins and caret 後,便可設定 Caret 的顏色與寬度大小 (建議設定 2)。可參考下列圖示:


[參考資料]